Harvesting Plums

This short article describes easy methods to harvest plums from your tree at home, and many apply to apricots as well. You can enjoy them yourself, share with friends and family, and donate extra fruit to local food agencies to help people in need in your community. See the Ladder-less Fruit Harvesting Techniques article for more photos of tools.
Harvesting the fruit is good for the tree, and minimizes waste and mess in your yard.
Because of the fast ripening (and dropping) of plums our volunteer harvest team schedules usually don't allow us to pick many plum trees. Contact us with questions about how to harvest and donate your fruit directly to food agencies and help others in the community.
What kind of tree do I have?
Plums are a member of the stone fruit family, along with other popular fruits like cherries, apricots, and peaches. These trees are deciduous and can grow to 20 feet high or more; they're much easier to harvest if kept pruned to 10 feet or less.
There are many different varieties of plums and they come in all shapes, sizes, and colors. In California and the Bay Area, plums ripen between the end of May through August depending on the specific variety, weather, and microclimate.
Here are some of the varieties Village Harvest sees in home gardens in the San Francisco Bay Area:
- Large round varieties: Santa Rosa, Satsuma, Mariposa, Green Gage
- Small round varieties: “Cherry” plum
- Oblong types: French Prune, Italian Prune
When should I harvest?
Plums develop for 3 to 4 months from blossoms, and ripen from hard and green to fully colored and soft on the tree. Plums will only be ripe on the tree for about 2 weeks and drop as they become over-ripe. There may be a mix of green-ish unripe fruit and fully ripe fruit on the tree at one time.
In the Bay Area, Santa Rosa and small Cherry plums typically ripen in late June, with Satsuma, Mariposa, and Green Gage in July. Prune plum varieties are most commonly ripe in August.
Plums don’t improve (much) after picking from the tree, so you’ll want to pick your tree several times during the 2 week season. You’ll enjoy the best fruit, and this will also reduce the potential mess of fruit falling on your landscape or sidewalk.
How can I tell whether a plum is ripe?
Color: Plums ripen to many colors depending on the variety – from almost black, purple or red, to pale green. It can be difficult to tell if a piece of fruit is ripe just by looking.
Taste: The best way to determine ripeness is to taste. A ripe plum will be very sweet, flavorful, and juicy. A less ripe plum will have no sweetness.
Feel and texture: Ripe plums are soft and “give” when pressed. An overripe plum will be very soft and squishy (and splat on the ground).
Smell: Give your plums the smell test. A ripe plum should smell sweet and fruity. An unripe plum will have little to no smell.
How to Harvest:
Pick By Hand:
The easiest and safest way to pick plums is by hand from the ground. Grasp a plum with your fingers and push UP on the stem; when ripe it will snap off the branch. You may need to grasp the plum with one hand and the branch with the other.
Some plum varieties need to be pulled, some come off better when pushed up. Try both ways and choose the method that minimizes any damage to the fruit and doesn't pull the stem out of the fruit leaving an open hole.
Pick with a Pole Picker:
If they're still firm, larger round plums like Santa Rosa or Mariposa can be picked with a telescoping pole fruit picker with a metal basket. Place the picker basket under the fruit, and and use a gentle tug with the metal fingers around the fruit.
Shake and Catch:
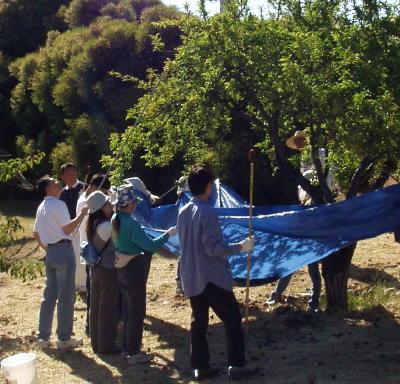
For fruit that’s too high to reach, you can use a stepstool or ladder to reach higher. But for plums there’s an easier way that works for many trees; we call it “Shake and Catch” and it allows owners to safely harvest plum trees 20 feet high or more.
You'll need a tarp or sheet, and a stick that can be a broom or a light garden tool, and preferably 3 to 4 people. It can be done with 1 or 2 people although the results may not be as good and gentle if fruit drops onto the ground.
- Gather 3-4 friends or family members around the tree.
- Stretch a tarp or old sheet under the tree making sure it doesn't touch the ground.
- Gently shake the branch above the tarp.
- Catch the fruit into the sheet or tarp; usually only the riper plums (or other fruit) will fall, without being bruised or damaged.
- When the tarp is full or heavy enough, grab the corners to gather the plums together, then scoop the plums into boxes and sort.
As a variation of this method, we’ve seen some homeowners drape a net under the tree. As the wind shakes the fruit down, it catches in the net. Daily, gather the fruit for breakfast.
Pick using a ladder or stepstool:
If you want to use a ladder or stepstool, pick safely – it’s never worth hurting yourself for a piece of fruit. Place ladders or stepstools carefully and test the stability, keep your body facing the ladder, and don’t reach far. Move the ladder instead of stretching.
Hang a bucket or bag near the top of the ladder to gather your harvest.
Sorting:
You’ll want to sort and discard any unusable fruit, as you pick or in a batch after picking. The best plums are fully colored, somewhat firm, have no damage to the inside, (and are delicious).
Sort out fruit that is damaged or split, too soft, oozing, or too unripe. Extra ripe soft fruit is delicious but very perishable; refrigerate or use immediately.
Enjoying your plums:
Where to Share:
For the fruit you want to share, gently pack plums in small volumes in a box or bag. Refrigerate if you need to keep them a few days.
Most food pantries are very grateful to receive your excess fruit for people in need. Our Community Food Drop Off Locations map and list shows the locations of food agencies in the San Francisco Bay Area and beyond. If you are looking for somewhere to donate your home grown fruit, reference this list for details.